Friday, December 30, 2011

Adding The BDS To The Frame

    The Back Driver Section (BDS) is a bit less than 4" long and took 18hr 36min to print.  The significant amount of green ABS support and the need to switch extruders on each of many layers drives the print period.  The back end of the BDS section is at the top.
    The support material removed in a manner similar to the other frame sections leaving stripes of green ABS attached where the support material came in contact with the black frame.  Removal is done with a model knife.
.  
    Once the frame has been cleaned up it is ready for attachment to the other two sections previously assembled.   Before assembly the new section is held in place using rubber bands to check fit and dimensions.  Small adjustments were made by removing material at the joint to square up and set the driver to driver distance.
 
    During gluing with CA various tools were placed on top to hold the frame solidly on the glass desktop.  The ruler shown was used to verify that the frame was straight from front to back.  Rubber bands are just visible at the rear holding the new BDS to the rest of the frame.  The ruler is 15" long.
    After the tools were removed the rubber bands are readily visible.  The band and red plastic wedge at the top side in the photo were used to tension the frame with a bit if side pressure to hold it straight aligned to the ruler.  You might be able to note that at this point the frame is 12" long.   The three sections (MIDS, FDS and BDS) are half of the frame sections that will ultimately be included.  This portion contains the four sets of drivers.
    The three parts of the frame are each built with integrated sub-parts such as cross braces and the brake hangers.  Some of the larger cross parts such as the link supports and boiler mounts will be separately added as they are fairly large and would have made the build of the frame sections unwieldy.  A fourth set of drivers is being fabricated to complete the ensemble.  Previously the Front, Intermediate and Main driver sets were built and shown.  The Back set is the fourth.  Once all drivers sets are ready and fitted, the frame will be drilled and tapped for the pedestal binders and they will be attached with screws.
    Design effort is underway to complete the frame sections over the trailing truck.  Much of that design work was done prior to the BFB-3000 3D printer arriving.  It may need to be subdivided into two sections as has been contemplated, although it would just barely fit within the Z height capability of the printer (8 1/4").   The combined Back Frame Assembly is about 8 1/8" long as currently designed.  The trailing truck equalizer lever mount needs to be designed.  It is located on the frame about half-way between the small mounting bracket at left center and the left front of the frame.
    The back frame slides into slots on the main frame and gets bonded in place.  The trailing truck rides under this frame section supporting the firebox end of the boiler and cab.  Other moving parts also attach to the back frame including the truck spring mounts, springs and equalization lever and rods, and centering spring.  The above design assembly does not yet show the equalization lever mount, both equalization rods or the centering spring assembly.  Once the back section is added the frame will be about 18" long.
    Another part of the frame is located up front, the Pilot and Cylinder Section (PCS) frame.  That portion will add about 4" more to the front.

Thursday, December 29, 2011

Pedestal Binder Fabrication, Clean-up and Fit Checks


    Additional pedestal binder bars were fabricated, three identical sets for the Front, Intermediate and Back driver slots and a slightly longer set for the Main driver slot.  The Front driver set is shown cleaned up ready for use while the remaining three sets are still attached to the raft/support structure.  The binders are easy to remove by hand but do have a series of stripes of residue support material that required removal by sanding with the Dremel sanding wheel.
    The above photo shows the slight difference between the Main driver slot binder at the top with one of the other three binder sets.  The difference is small.  The wider Main driver slot accommodates the larger diameter bearing and axle.
    The binders were trial fit using undersized 1-72 machine screws.  The screws for final assembly will be 2-56 after the frame is tapped.  The smaller screws fit snug enough in the pilot holes to stay in place, but have little strength.
    The Front driver set is shown with binders secured in place using the 1-72 machine screws.
     The remaining sets of binders for the existing portion of the frame consist of one set for the Intermediate slot and one set for the Main slot.  The Main slot binder is slightly longer.
    The machine screws were first run into the binders flush with the mating surface.  In one or two cases the holes are almost loose.
    The frame holes are slightly smaller and require slight force from a small #00 Philips screwdriver to drive into the frame holes.  Care was taken to avoid over-tightening and removal of material so that later tapping with the 2-56 tap will be more firm.  The Intermediate driver set is shown above installed with binders held in place with 1/72 machine screws.
The Main driver binders were also installed in a similar manner.  Note that all drivers now have residue material removed and are ready for painting as are the binders and frame assembly.  At this stage the overall assembly can be handled without having driver sets fall out.  The drivers have a noticeable amount of vertical play which will allow the spring equalizer systems to work when the wheels move over uneven track as in the prototype.  None of the spring equalizer system is yet installed, however, the bearings have slots to mate with the spring brackets and the brake hangers have holes for the beam fulcrums.  

Main Driver Residue

    The main driver set was taken apart (not yet bonded with glue) and residue support material removed.  The bearings and axle had already been sufficiently cleaned.  The inside of each driver needed sanding with the Dremel tool and minor touch-up with the model knife before reassembly.  Drivers will not be glued at this point until all chassis frame fit checks are complete.

Wednesday, December 28, 2011

Pedestal Binder Build and Fit Check

    The pedestal binder is a bolted on part that closes the bearing slot and strengthens the frame.  It has two pockets that closely match short posts on the bottom of the frame close to the bearing slots.  The sides of the bearing slots are called pedestals.  The binder acts to close the frame across the bottom of the bearings giving considerable added strength to the frame.  It also doubles as a keeper for the bearings.
     The original PLA pedestal binder is shown at right in the photo above.  A pair of new black ABS pedestals for the Front, Intermediate or Back drivers are at center still on the raft and support green ABS.
    The pedestal binders have been removed from the green support ABS.  The bottoms still have residue support material which will be removed with the Dremel sanding wheel.
     The finished pedestal binders are shown near the frame ready for installation.  Both the frame and pedestal binders included pilot holes to be used in guiding the drill and tap steps to be done later.
   
    The binders have been placed in position ready for drilling.  The first step will be to drill through both the binder and bottom horizontal member of the frame with a pilot drill for a 2-26 tap.  After that the binders will be removed and the frame tapped.  The binders will be drilled with a clearance hole for the 2-56 screw using the tapping pilot hole as a guide.  Then the binders can be attached using 2-56 screws.  The binders can then be removed to permit wheel set removal during the balance of model building as needed.

    The photo above shows the binders in position with the wheel set in place.  The wheel set still has slack to move up and down for spring and equalization operation.  None of the parts built for the frame have paint touch-up.  That step will be done once all fit checking is complete, probably after build and attachment of the Back Driver Section and installation of the Back driver set.  Painting of the frame will not take place until all six portions of the frame are attached.

Black Front Driver Set Printing

    The set of parts to assemble the front (or back) driver are shown above.  Each sits on it's respective green ABS raft and support structure.  The wheels and bearings are printed horizontally on the printer platform while the axle is printed vertically.  The orientation and raft-support structure was determined after many trials, particularly for the wheels and axles.
    The support removal and clean-up process is as follows:  Remove the support material by hand or with pliers, remove residue strings with pliers, remove attached residue with model knife and Dremel tool sanding wheel, trim off any remainder with model knife.  The above picture shows residue support after being removed from the bearings in the upper left along with the bearings.  The axle in the top middle has already been cleaned up.  The driver at left has about half of the strings removed with attached residue still to be removed.  The driver at right has about half of the attached residue strings remaining after sanding with the Dremel tool
     Another view of the parts in the process of support removal and clean up.
     The finished set of drivers, bearings and axle all fit properly and are ready for painting and installation.
    The assembled MIDS-FDS chassis with all black ABS driver sets.  The main driver set at the rear still needs to be cleaned up.

Continued Assembly of MIDS and FDS Frame Sections

     The temporary cross brace (white PLA) above had been fabricated previously.  It was used near the joint to maintain proper side frame spacing during glue cure.  It was held in place by friction and a crossed rubber band shown in a previous blog posting.  After glue curing the part was removed.
    The combined MIDS-FDS frame assembly is approximately 8.5" long.  It spans the locomotive driver section from the Front, through the Intermediate and Main drivers.  The three cross braces are built integrally with the side frames along with the four brake hangers visible protruding out from the side frames.  The brake hangers are for the Front and Intermediate drivers.  The correct 67" scale center to center spacing of the driver bearing slots has been verified.  Minor adjustments to the joint were made to put the spacing for the Front driver in correct position and to keep the frame straight and square.
     The rear view shows the residue of the green ABS on the cross frames.  Since they are rather thin, most of the material was left in place and will be painted.  That will result in a corrugated look on the rear of the spacers which is not true to prototype.  The material might be removed with a very small cutter on a Dremel tool, but since the parts will essentially be buried deep inside the locomotive, they will be left as is.  
    Three sets of drivers, bearings and axle are shown alongside the MIDS-FDS frame portion.  From left to right they are the black ABS Main, black ABS Intermediate and green ABS Front (or Back).  The Main and Intermediate will be used on the model while the green Front or Back will be replaced with a black set.
    The frame is placed inverted to permit insertion of the Main driver set by sliding the bearings into their respective slots.
    While still inverted, the Intermediate driver set is slide into position in a similar manner.
     Finally, the Front driver bearings are slide into their respective slots.  At this point the pedestal binders would normally be installed with screws.  They bridge across each slot and retain the bearings within the slots.  They have not yet been built and will be built following build of the black Front driver set.
    With the pedestal binders in place the frame can be handled without the wheels falling out.  The temporary assembly was carefully rolled over while manually holding the wheels in place so the photo could be made.  The drivers have different size counterweights and the main driver has a much larger side rod shaft.  The insides of the main drivers still need to have residue removed to make them ready for painting.

Tuesday, December 27, 2011

Gluing FDS and MIDS frames

    The FDS and MIDS frame sections are shown being bonded together with CA.  Interlocking features are located on both portions.  Prior to gluing, cleaning and dimension checks were accomplished.  The bonding was done on a flat glass desktop with rubber bands employed to apply pressure to the assembly holding it in place while the glue cures.
    An extra chassis spacer was located between the crossed rubber bands to assure that the frame was square through the bond region with proper spacing.  No cross frame is located in this area of the prototype per the plan.  The Front driver brake hanger is just forward of the joint region providing good vertical support while the spare cross frame provides good horizontal support.  The hand file provides weight to hold the frame down on the flat glass to keep it in alignment.
    Frame painting will wait until all the chassis frame is assembled later.  The next step will be to complete build of the front driver-axle-bearing assembly and the set of pedestal binders.  Hole drilling and tapping will also be done to provide a means of retaining the wheel sets and removal for further work as needed.

FDS Frame After Support Removal

     The Front Driver Section (FDS) frame supports have been removed.  The amount of residual green ABS is similar to the amount remaining when the Main-Intermediate Driver Section (MIDS) immediately after removal of support material.  The front view above shows very little remaining support material, most of it is on the rear side of portions that were horizontal during the printing.
     This includes the cross brace and forward edges of the slots and vertical portions of the frame.  The material is relatively thin strips of green ABS that are removed with either an thin sharp model knife or the Dremel tool sanding wheels or small cutter.
    Virtually all of the green support residue has been removed from the MIDS frame and it is ready for paint touch-up.
     The two frame portions (there are a total of six) are designed with interlocking mating features that will be glued together to form the overall frame.
    The FDS and MIDS frame portions mate quite well and once the FDS is cleaned up the two can be glued together.  The combined FDS and MIDS portions provide bearing slots for the Front, Intermediate and Main drivers.  On the front of the FDS portion the Pilot-Cylinder Section (PCS) will be installed.  The large cylinder structure, pilot deck and cow catcher at the front of the locomotive mount on the PCS.  The rear of the MIDS frame will attach to the Back Driver Section (BDS) which will provide the bearing slot for the Back driver.  The BDS frame will in turn have the Trailing Truck Pivot Section (TIPS) attached and the final frame section will be the Aft Boiler-Cab Section (ABCS).
    The two sections above are 8.5" long when joined.  The remaining four sections will extend the frame structure to 20.98" overall length.  Beyond the frame the front coupler and tender coupling will add a small amount of length to 23.29" approximately.  That will include just the locomotive.  The tender will add a separate amount to the total model length, making the display about 3' long overall.

Monday, December 26, 2011

First Run of Front Driver Section (FDS) frame

     The initial printing of the Front Driver Section (FDS) assembly took 18hr 16min and was done just as the Christmas holiday began.  No further work was done as social duties out of town were required.  The first photo shows the top front of the section with the frontmost cross frame showing and the top of the pilot truck pivot of black ABS frame embedded within the green ABS supports.  Further back along the side are the forward set of brake hangers for front drivers.  Those sub-assemblies also provide the forward equalizer coupling beam pivots.  The coupling beams lie within the frame openings as will be seen later during build and assembly.
    The bottom front of the FDS assembly photo shows the pilot truck pivot on a brace between the sides of the frame.  The photo also shows the holes for the screws that will be used to attach the forward set pedestal binders or frame keepers that span the forward frame slot that contains the front driver bearings,  The overall assembly is 3 3/4" wide, 1 5/8" deep and 4 1/4" tall.  Some 432 Z layers were required to complete the printing.
    Material extrusion is a linear process so the time to print is driven by the total volume of material used including both black and green ABS.  When the machine changes from one color to the other, it must pause and heat up the opposite extruder which adds several minutes for each change over.  Most layers required such a change as they included both green and black portions.
    The next step for this part will be to remove the green ABS carefully and clean off residue material from the FDS frame.  Also on the agenda is build of the pedestal binders for the FDS and the previously built MIDS frame sections.  Also, drills and taps have been ordered along with small machine screws so the pedestal binders can be attached to retain the wheel assemblies and provide the means to remove them as necessary during the design, build and fit checking of the overall locomotive model.  Several other holes on the FDS and MIDS frames other than the pedestal binders will need to be drilled and/or tapped as well.
   

Friday, December 23, 2011

Progress Making Drivers Axles and Bearings

    The main drivers, axle and bearings have been now built successfully in black ABS along with the intermediate drivers, axle and bearings and the MIDS frame section.  The fit of the various parts is good with a suitable slide fit for the bearings in the frame, low rolling friction fit between the bearings and axles and snug fit between the axles and driver hubs.  
    Now that the MIDS section of the frame is complete the next forward section will be built.  The method of frame build is not prototypical it being necessary to subdivide the frame into about 4" sections for the build.  The complete frame will be nearly 24" long including the main frame and trailing truck frame portions.  The various frame sections feature overlapping joints that will be glued together.  On the prototype the trailing truck frame portion is bolted in place on the rear of the main frame.  On the model the trailing truck frame portion will be glued in place instead of the many bolts used on the prototype.
    To complete the MIDS frame portion, frame keepers will need to be built.  The frame keepers span the bottom of the open frame slots that permit the bearings to slide into place from the bottom keeping them in place and strengthening the frame in the process.  As on the prototype these will be bolted on to permit disassembly later if need be for modifications or repairs.  The frame keeper bolts will likely be 0-80 size machine screws.  To accommodate the screws, the frame will be drilled and tapped.
    The intermediate driver-axle-bearing assembly is in the foreground while the main driver-axle-bearing assembly is in the background.  The mains have the large rod shafts protruding to accept the side, main and eccentric rods while the intermediate rod shaft need to accept only the side rod.  The main drivers have had a preliminary cleaning to remove the green support ABS and still need grinding and carving to remove the remaining material before painting and assembly.
     The main driver at left sports a much larger counterweight than the intermediate at right.  You can readily see the green strip residue of the support material on the inside of the main drivers at left.  The intermediate drivers on the right have already been cleaned up by removing all traces of the support material in preparation for painting.  The parts above are dry fit and will not be glued until painted.  At this moment only painting of those surfaces that were trimmed and ground is anticipated.  Depending on how that comes out, the balance of the drivers, bearings and axles may or may not be further painted.
    The sizes of the drivers are shown above by including one set of the previously built green ABS drivers used to develop the build and design processes.  These will not be used however and new ones in black ABS will be built.  At left is the main driver set which has the largest counterweight.  The intermediate driver set in the middle features a counterweight that lies between the main and the front/back driver at right.  Also, the main driver features a larger axle than the other driver sets as per prototype.
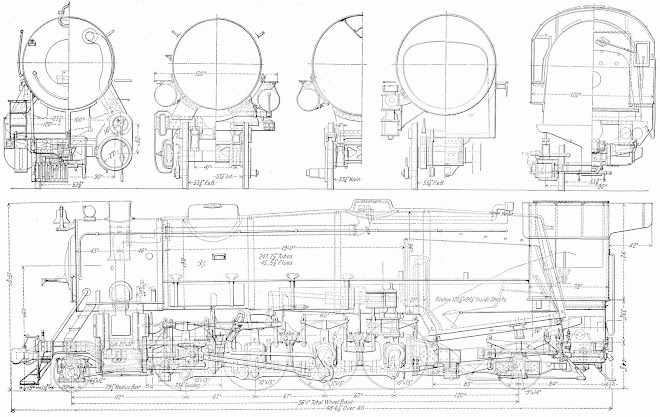
     The main driver has the much larger rod shaft while all the other drivers have a small rod shaft.  The bearings for the main are larger to accommodate the larger axle diameter while all other axles and bearings are smaller.  On the prototype the main axle is 12" diameter while the other driver axles are 10" diameter.  Prototype drivers are 63" in diameter over the tire portion with the flange extending about 1".  All these dimensions have been successfully reduced to 1/2" per foot, 1/24th scale on the built parts.
    The arrangement of the drivers is shown above in order from right to left.  The order is Front, Intermediate, Main and Back.  New Front and Back driver, axle and bearing sets will be built to complete the driver sets for the model.