Thursday, January 12, 2012

Spring and Equalization Parts

    Making the small parts of the locomotive springs and equalization system has proven time consuming and challenging.  It is becoming clear that part orientation on the printer is critical.  The set of five short trapeze levers above were printed with the sides vertical.  Yield of good parts built this way was very poor with just two parts being usable.
    The two parts in the above photo were good enough for use after minor trimming with a model knife.
    The short trapeze levers are about 1" long and have side bars only 0.030" thick.  The nearest side will have a clearance hole for a 1-72 machine screw while the opposite end with the larger round feature will be threaded for the 1-72 screw.  The top "T" shape slides into the slots on the top of the springs.  The lever connects the center four drivers to a hole in the frame anchoring one end of one of the equalizer strings.
     The other end of the springs connect to an intra-chassis lever that pivots within the brake hanger between  the Front and Intermediate drivers and another between the Main and Back drivers.  The lever connects equalization pressure to the neighboring spring via another long trapeze lever.  Above is a photo showing a poor yielding run that only netted two usable levers that need work to clean them up.  They are somewhat ragged though.
    By rotating the levers on the build platform a very good set of five levers was produced.
    The above photo shows the levers just after removal from the raft and supports.
     The levers are a bit over 1" long and came out very good with only minor cleanup needed.
    The small amounts of clear PLA that adhered to the levers was easily removed by prying them loose using a model knife.  Very little cleanup was required.
    The above photo shows a set of four riser and clamps on the raft and supports.  None of these were directly usable.   This run was done with clear PLA raft and supports where a previous run used green ABS raft and supports for black parts.  The previous run was all good, this one was all bad.  The combination of materials as well as the orientation is critical.
    The above photo shows a trial fit of the two trapeze levers, spring on riser and clamp and the intra-frame equalization lever.  The right hand long trapeze is located so as to connect to the spring of the driver forward of the Intermediate driver shown.  The screws used as pivots for the intra-chassis lever are 3-48 while the attachment screws for the trapeze levers to the intra-chassis lever are 1-72.   The spring and equalization portion assembled above works freely and flexes the spring when pressure is applied directly from the driver or via the long trapeze lever forward of the wheel.
    Another run of risers arranged sideways was more successful, most being good.
    Similarly, runs of short trapeze levers oriented sideways on the raft and support resulted in very good results.  It is more difficult to remove from the PLA support, but it does come away with careful use of needle nose pliers and finger pressure.  Flexing the support tends to release the black ABS part without too much residue.
     Above is a collection of good parts being accumulated to build and install the spring and equalization system on the frame.  At left is a stack of spring leaf sets to build the seven remaining spring sets.  The risers and clamps in the middle will provide part of the spring mounts, seven are needed so one extra is available if needed.  The three intra-chassis levers above complete the needed quantity.  They have already been drilled for the center 3-48 pivot screw and 1-72 trapeze attachment screws.  The short trapeze levers at the bottom need drilling and tapping to accept the 1-72 screws.  Only three short trapeze levers are still needed.

    Above a set of long trapeze levers still on the raft and support structure are added to the collection of parts.  Six long trapeze levers are needed to complete the ensemble of parts.
    The eight long trapeze levers above will need removal from the raft and support structure and then drilling and tapping for the 1-72 attachment screws.  With these parts enough are now available to fabricate the bulk of the spring and equalization system.  At each end of the chassis portion being built a cross lever is used to carry the equalization forces forward to the pilot truck and backwards to the trailing truck.  These levers will need design and fabrication to complete the system of levers for locomotive suspension equalization.

Tuesday, January 10, 2012

Locomotive Spring Leaves

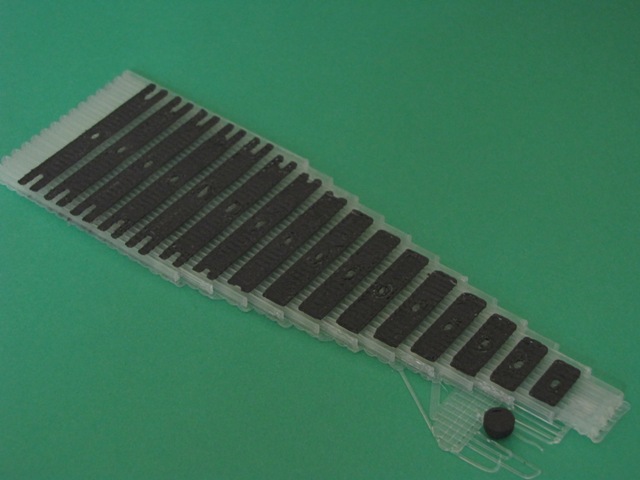
    Spring leaves are very thin.  The BFB-3000 software provides a selection of three Z layer print thicknesses, 0.125, 0.250 and 0.05mm with a target leaf thickness of 0.020".  The above three samples show results of the three Z layer thickness prints from left to right.  The 0.125 layer has thin outlines and disconnected fill at various points.  The 0.25mm thickness in the middle has good outline and fill while the 0.5mm print at right has ragged outlines and smearing of the critical center holes.
     The smearing and ragged outlines of the 0.5mm layer are shown above.
    By contrast the 0.25mm Z layer print in the middle has good outline, fill and center hole definition.
    Although the outline of the 0.125 Z layer print is good, the fill is incomplete.
    As a final step, removal of all three was done to determine the usefulness of the versions.  The 0.125mm layer at left can be removed but the larger springs with the notches proved impossible without breaking.  The 0.25mm layer in the middle were all successfully removed largely by flexing the raft and support with an occasional use of a model knife to pry loose small regions.  The 0.5mm Z layer version at right had too much adhesion and proved impossible to remove without breakage.
     The 0.25mm layer spring was assembled on a riser and a cover placed on in the photo above.  The spring assembly can be done without the need to grind away residue clear PLA support material.
     Three different build methods are shown above.  At left is the most recent build with the leaves flat on a clear PLA raft and support.  The middle assembly has the leaves printed flat and then sanded to remove the residue raft and support material and the one at right had the leaves built on their side.
    The build flat on clear PLA raft above looks and works good and fits well on the riser.
    Although the spring assembly with sanded away green ABS residue looks fairly good, the extra step of sanding opens the door to damage for these very small parts.  This version also looks and works good.
     The version with the spring leaves built on their side results in thicker leaves that are a bit more ragged in outline definition and require more trimming than the PLA raft version.
   
    The assembled PLA raft version in close up reveals the clear residue that was left in place.  It does not interfere with spring operation, however, four leaves were left out so that the stack would fit under the spring clamp.
    Above is the ensemble of spring leaves built flat on PLA raft along with the riser and clamp at the right.  Center hole and slot definition are all good.
    The spring leaves, riser and clamp are all very small parts as can be seen in comparison with a ruler.
     Nearly invisible at right is the raft upon which the springs were built.  No discernible residue remained on the raft and the raft was essentially intact after spring leaf removal.
    The above photo shows a partially assembled spring assembly with several leaves slipped on the post of the riser.  They fit well and are not overly loose.
    The whole set of spring leaves is shown above installed on the riser post with the clamp at right.
    The clamp will be glued over the spring assembly on the riser to retain the spring leaves in place.  Eight assemblies are needed, one for each driver.  The slots will accommodate the top of the trapeze levers that will connect the spring to the frame or equalization levers.

Saturday, January 7, 2012

Locomotive Springs

    The previous blog post showed results of fabrication efforts of the locomotive spring leaves.  Leaves have been built on the side edge and on the flat of the spring.  Above is shown spring assemblies of those methods.  The closer spring assembly was fabricated on side edge while the further one was fabricated down flat.  The leaves built on edge have varying thickness and must be at least 0.03" thick which results in fewer leaves and a noticeably stiffer spring assembly.  The ones built flat are 0.020" thick which results in a lower stiffness judged to be more realistic for this model.  The side built leaves have poorer hole and slot definition.  The flat built ones required sanding to remove the green ABS residue.  It is easy, but tedious to remove, but doable.
    An attempt to build springs vertical was also done, examples are shown above.  These exhibited very poor definition of holes and slots.  The BFB-3000 printer cannot easily fabricate the narrow strips of material close together as needed around the holes and slots.  This leads to badly distorted unusable parts.
    A second run of leaves printed flat was attempted using the small amount of green ABS left which resulted in a very poor raft structure, probably due to the difficulty the printer had drawing the small amount of remaining ABS on the spool.  This was attributed to the high spring force of the ABS.  The machine was re-loaded with clear PLA to make rafts and support structures.  The first run with clear PLA and flat spring leaves is shown above.
    The leaves were readily removed using care, mostly by flexing the raft by hand.  The smaller spring leaves popped off while the larger ones needed a bit of coaxing using a model knife to pry loose small portions that wanted to stick.  The leaves had good definition and only a very thin layer of clear PLA residue remained on the leaves.  They may be usable without the need to sand off the residue.
    The spring leaves are to be mounted on the spring riser and clamp parts with the holes in the spring leaves fitting over the post on the middle of the riser.  When checking for fit it was discovered that this set of spring leaves have overly small holes and will not readily fit over the post.  Rather that run the risk of breaking the post, the design was modified to increase the hole dimensions for better fit.  It takes near 3hr to fabricated a set of spring leaves.

Thursday, January 5, 2012

Locomotive Springs

    Locomotive springs are connected to the driver bearings using a riser that straddles the frame and rests on the top portion of the bearing in slots.  The spring leaves are clamped on top with a small frame to hold them in place.   The above photo shows four sets of spring risers and clamps.  The riser has a small vertical rod that passes through the spring leaves to hold them in place.  The support material is green ABS and the parts are black ABS.
    After removing the bulk of the support material small residue strips are visible on the inside of the riser and top of the spring clamp.   One set at left shows the arrangement of the two parts.  The clamp will be glued in place after the spring leaves are installed on the retainer post.  The spring riser will be inserted into the slots on the top of the bearings, but will not be glued in place.  Equalization rods will apply pressure to both ends of the springs holding the assembly in place on the top of the bearings.  The rods will be held to their respective attachment points with small machine screws.
    During early testing with the BFB-3000 printer spring assemblies were built using interleaved spring leaves.  The interleaving process did not work well as the spacing between the leaves did not permit meshing the two halves of each assembly.  Consequently on this trial individual spring leaves were fabricated adjacent to one another laying on their sides as shown on the raft/support structures above.  The spring leaves had a number of issues such as difficulty in removing them from the supports, uneven thickness that would prevent them from stacking correctly and incomplete build of the black ABS on portions of the spring leaves.
    At right of the above photo are the separated spring leaves.  They are not at all satisfactory so another attempt was done by designing a version that lay flat on the top of the raft structure as shown at left.  Those leaves were more uniform in thickness and had good shape definition.  They were readily removed from the support but as has been seen on other runs had strips of green ABS across the bottom of each spring leaf.  Removal of the residue support would be tremendously difficult considering the very thin leaf so this method also proves difficult to consider, but is better than building the leaves on their side as was done above.
    The presence of the green ABS residue prevented a full set of leaves from fitting within the clamp portion of the spring riser.  The picture above shows a partial set assembled as is intended.  The springs work and have a spring pressure about as expected!.   The tops of the spring clamp have support residue that will be removed using the Dremel tool later.  
    Above is shown the assembled partial spring leaf stack in the holder at the top of the riser in place in the slots in the bearings.  The assembly has good clearance and moves freely.  The left end of the spring lies directly above a mounting hole in the frame for a trapeze rod that attaches to the spring above.  The right end of the spring will also attach to a trapeze rod that straddles the frame and attaches to an equalization lever that lies below in the middle of the frame.  None of those rods have been built yet, however, during initial test runs similar rods were successfully built for the trailing truck spring assembly.
    Another method of building the spring leaves will be to build them on end without the use of any support material.  Similar vertical thin wall items have been built and this method will severely limit the amount of green ABS support in contact with the spring leaves.  The leaves will be limited in width to that value imposed by the printer resolution, 0.025" or more.  The leaves shown in the above photo are 0.02" thick and have some 0.01" thick residue stripes across.  The spring assembly thickness is 0.325" consequently about thirteen 0.025" leaves can be contained in the clamp.  The longest leaf is just short of 2".  The leaves are 0.25" wide.  These dimensions give some idea of the ability of the BFB-3000 to fabricate small parts.

Sunday, January 1, 2012

Fit Testing Drivers to Frame

    Efforts during the past months have now culminated in fit check assembly of the central driver portions of the frame to the driver sets.  The above 3D CAD illustration shows a top view of an assembly of the various drawings used to fabricate the parts as they should appear when assembled.
    The three central frame sections (FDS, MIDS and BDS) are glued together while all other parts have sliding fits permitting rotation of the drivers within their bearings and sliding of the bearings up and down in their frame slots.  The bears are retained by the pedestal binders which are screwed in position.
    The last part to be fabricated was the Back Driver Set.  The set consists of the two drivers, the bearings, the axle and the pedestal binders.  Each of the parts above was separately fabricated in the BFB-3000 printer.  The longest run time was for each driver at some 3hr+ each.  The green ABS is the raft and support material for the parts which are fabricated in black ABS.  The green supports must be removed before the driver set can be used.
    The first step consisted of using a needle nose pliers or hands to pull away the majority of the support material.  Residue of the support ABS are stripes that adhere to portions of the parts.
   The second step is to further remove portions of the stripes that are suspended between portions of the parts, particularly the drivers.  That removal is done using a needle nose pliers.  Some cutting with the model knife was also used to trim portions where feasible.  The result still leaves attached residue segments of green ABS.
    The stripes of green support material tend to form small ridges on the black part.  Some can be cut away, but that has proven very time consuming and not easily done.  The residue strips of support adhere tightly to the black part material.
    The final steps of residue removal is grinding away using a Dremel sanding wheel.  That proceeds smoothly although the tool must be used carefully as the plastic is easily ground away excessively.  The final result of part clean up is shown above.  
     The Back Driver Set is assembled above.  The bearings are slide unto the axle after installing one driver.   The bearings have an outside and inside that differ.  The two pedestal binders will be installed after the driver set is installed in the frame.
    The above photo shows a collection of the parts that form the central driver portion of the frame and the driver sets.  
    The first step in assembly is to place the frame on it's back and slide the bearings of each driver set into their respective slots.  The set of pedestal binders is shown with 1-72 temporary screws in place ready to install on the frame.
    The next step is to screw the pedestal binders in place.  All are the same except those for the Main Driver which are slightly longer to provide space for the larger main axle.  The screws used here are self threaded in place for now.  They are undersized #1-72 screws.  The frame will be drilled and tapped later for #2-56 screws.
    The fit check assembly of the drivers and frame is shown above.  The drivers turn freely and the bearings slide up and down in the frame slots freely.  The black ABS parts will receive touch-up flat black paint to hide remaining sanding and cutting marks later.
    At this point the central driver portion of the chassis has been completed except for paint touch-up and appropriate threading for the final attachment screws.  There remains both front and rear portions of the frame to build and fit.  The front portion is the Pilot-Cylinder Section (PCS) that will mount the cylinder block, front platform and cow catcher and ride over the pilot truck.  The back portion will be possibly one or two sections that mount the firebox and cab and ride over the trailing truck.
    Other parts associated with mounting the valve gear and boiler will be glued to the chassis frame later as well.  Along with the side rods and valve gear many, many parts remain to be added to the portion completed so far.  Of course later the boiler and cab assemblies will be added as well.  These too will need to fabricated in sections to remain within the working volume of the 3D printer.