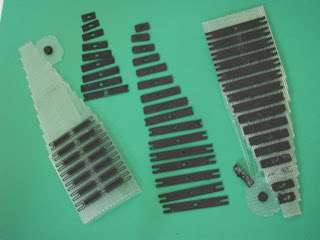
The smearing and ragged outlines of the 0.5mm layer are shown above.
By contrast the 0.25mm Z layer print in the middle has good outline, fill and center hole definition.
Although the outline of the 0.125 Z layer print is good, the fill is incomplete.
As a final step, removal of all three was done to determine the usefulness of the versions. The 0.125mm layer at left can be removed but the larger springs with the notches proved impossible without breaking. The 0.25mm layer in the middle were all successfully removed largely by flexing the raft and support with an occasional use of a model knife to pry loose small regions. The 0.5mm Z layer version at right had too much adhesion and proved impossible to remove without breakage.
The 0.25mm layer spring was assembled on a riser and a cover placed on in the photo above. The spring assembly can be done without the need to grind away residue clear PLA support material.
Three different build methods are shown above. At left is the most recent build with the leaves flat on a clear PLA raft and support. The middle assembly has the leaves printed flat and then sanded to remove the residue raft and support material and the one at right had the leaves built on their side.
The build flat on clear PLA raft above looks and works good and fits well on the riser.
Although the spring assembly with sanded away green ABS residue looks fairly good, the extra step of sanding opens the door to damage for these very small parts. This version also looks and works good.
The version with the spring leaves built on their side results in thicker leaves that are a bit more ragged in outline definition and require more trimming than the PLA raft version.
The assembled PLA raft version in close up reveals the clear residue that was left in place. It does not interfere with spring operation, however, four leaves were left out so that the stack would fit under the spring clamp.
Above is the ensemble of spring leaves built flat on PLA raft along with the riser and clamp at the right. Center hole and slot definition are all good.
The spring leaves, riser and clamp are all very small parts as can be seen in comparison with a ruler.
Nearly invisible at right is the raft upon which the springs were built. No discernible residue remained on the raft and the raft was essentially intact after spring leaf removal.
The above photo shows a partially assembled spring assembly with several leaves slipped on the post of the riser. They fit well and are not overly loose.
The whole set of spring leaves is shown above installed on the riser post with the clamp at right.
The clamp will be glued over the spring assembly on the riser to retain the spring leaves in place. Eight assemblies are needed, one for each driver. The slots will accommodate the top of the trapeze levers that will connect the spring to the frame or equalization levers.


No comments:
Post a Comment